Apple : Movie Week: The complete guide to watching movies on your iPhone, iPad and Mac |
| Movie Week: The complete guide to watching movies on your iPhone, iPad and Mac Posted: 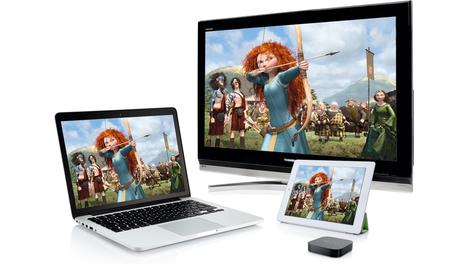 How to play video on your MacThe Mac was the first computer that supported digital video, its QuickTime architecture helping to ensure that for many years it was the platform of choice for digital video production. Later came video CDs and DVD playback, and of course iMovie and Final Cut. A consequence of all this support for video creation on the Mac is that it's always had excellent video playback capabilities for ordinary users too. So from the moment you turn on your Mac, it's able to play back digital videos and with a few tweaks and additions, play or convert any video format. There's no reason your Mac can't deal with even the most obscure video file. Since the release of the iPod Video many years ago, Apple's portable devices have allowed you to watch videos on the move as well, and in the latest versions of iOS there are a wealth of options for watching, recording and even editing videos on the move. iPhones, iPads and even the iPod touch are so powerful now that they can shoot and export in HD and you can rent, buy and stream HD movies directly on your device. The Apple TV is an affordable and amazingly versatile device, even more so if you use it to its fullest potential. And this being Apple, everything syncs together beautifully. So whether your movies are still on DVD and you need to get them into iTunes, you want to transfer a TV series to your iPad or you need to connect your iPad to your HDTV, our guide contains everything you need to know. Watching video on your MacYour Mac can play back almost any video format with a few tweaks…
Mac OS X has a whole layer of the operating system dedicated to playing video, not that you will ever actually see it. Core Video powers the QuickTime framework, which handles practically all aspects of video playback. In OS X 10.7 and 10.8 you get both QuickTime 7 and QuickTime X, though you may have to choose to install version 7 manually from your OS X installer. This is well worth doing since as a better established system it is often able to open files that X cannot. Both can perform audio and video recording using your Mac's camera and mics, and QuickTime X can even do screen recording. You can extend QuickTime's ability to play different movie formats by installing Perian, a handy little add-on from perian.org. Development has officially ended, but it still works well on OS X 10.8. The nice thing about Perian is that it's not a separate app, it just extends QuickTime. Spinning discs
If your Mac has an optical drive then it will be able to play DVDs and will come with the DVD Player app. In the System Preferences > CDs and DVDs section you can tell your Mac whether or not to open this automatically when you load a DVD disc. DVD Player is quite fully featured and supports HD, though not Blu-ray discs. If your Mac doesn't have an optical drive you can always add an external one connected over USB, and Apple's own is £65, with third-party models somewhat cheaper. You have another option, which is to share a remote disc drive. If there's a Mac on your network that does have a drive, open its Sharing preferences and turn on DVD sharing. Using the Remote Disc feature on your MacBook Air, new iMac or new Mac Mini, you will be able to connect to a disc in that drive. There's an important limitation however which is that commercial DVDs can't be played in this way; only data discs and home-burned DVDs without copy protection can be played. Of course you could rip a movie on the Mac with the drive and then access it via regular file sharing, a cloud-service such as Dropbox, or by way of AirDrop - you just have to think creatively. Buy or rent?Your Mac is able to access all kinds of movies online through purchase or streaming services, the biggest of which is the iTunes Store. This is really straightforward and simply involves signing in to iTunes with your Apple ID, locating the film or TV show you want and then choosing to buy or rent it. When you do, a copy of the movie will be downloaded to your Mac and you can start watching it inside iTunes before it has finished downloading. The movie's page in the Store will tell you the file size for SD and HD versions, and SD is generally cheaper than HD, though the resolution is of course lower. On smaller hard drives such as SSDs in the MacBook Air, downloading a few HD movies will start to use up space but the good news is that when you buy a movie and watch it, even after you have deleted the local copy it can be re-downloaded again at any time. So you do own the copy, it's just stored on Apple's servers until you want to watch it again. A purchased movie can also be downloaded to any iOS device signed in with your Apple ID. Renting is a little different, and although a copy of the film is downloaded, you get 30 days to start watching it and 48 hours from starting watching it to finish watching it. After this, it will be automatically deleted from your iTunes library. You can move a rented movie from your Mac to an iOS device though it can only exist on one device at once. If you rent a movie on an iOS device it can't be transferred to another device. You can also get your own movies into iTunes, of course: see the tutorial on the next page for how to do this. Other options
There are other streaming services that don't need iTunes, such as LoveFilm and Netflix, and these work in a regular browser window on your Mac, offering streaming but not downloads. The deal here is that you can watch anything as often as you like for a regular subscription, and both have iOS apps too. Netflix works on the Apple TV. You can preview any OS X-compatible movie file on your Mac simply by using the Quick Look command: select the file in Finder and click the 'eye' button in the Finder window or hit the Space Bar. This actually contains full playback controls and can be made fullscreen, as well as containing a link to open the movie in QuickTime Player or share it. Movies that you shoot on your iPhone or iPad can also be easily transferred back to your Mac and will of course work without the need for any format conversion. The quickest way to transfer movies is to connect your iOS device with its USB cable and open the Image Capture app that is part of OS X. This gives you direct access to the photos and movies and you can drag and drop them across. Of course you can import them using iMovie or iPhoto too, if you want them to be catalogued. iMovie is particularly useful as it can resize your movies on import as well as adding effects, image stabilisation and all sorts of other enhancements, though this does add more steps and some processing time to the transfer process. Alternative appsIf you're looking for third-party apps to help with video playback on your Mac, you can't go far wrong with the big two, currently VLC and Mplayer OS X, both of which are free and surprisingly fully featured and stable thanks to their avid developer base. These apps tend to be able to open most kinds of video file and also support things like subtitles a little more readily than QuickTime Player. They don't tie in with iTunes particularly, but if you're after an alternative player for weird and wonderful formats and codecs, they're well worth a download. How to rip DVDs and stream your moviesRip a DVD for iTunesRip your DVDs and convert them into an iTunes and iOS compatible format As Apple is phasing out optical drives on many new models of Mac, the DVD looks set to eventually go the way of the floppy disc. But in the meantime, many people have lots of DVDs that they want to view on their Macs and also on their iPads and iPhones. This can be done with a DVD ripper like Handbrake. But before you start, a word of warning. As it stands, you're not allowed to take a movie, even if you bought it in a shop, and rip it, even for your own use. The reason for this is that doing so involves breaking the copy protection, which is prohibited by a law called the EUCD in Europe and the DMCA in America. 'Fair use' ('fair dealing' in the UK) offers no exemptions for this. This is why every DVD ripper makes a point that you're only allowed to use it for unprotected, non-commercial DVDs. In some cases, they've enforced that rule. All that said, nobody has ever been dragged before a judge because they wanted to watch their own DVD on their own iPad, in much the same way that the recording industry has never prosecuted anyone solely for ripping their own CDs - also technically an illegal act in the UK. Downloading movies illegally, on the other hand, is a big no-no. Torrent sites especially are a potentially dangerous way to pirate because you're uploading bits of the movie at the same time as downloading others. Legally speaking, that means you're distributing illegal, copyrighted files as well as acquiring them. How to rip your DVDs using Handbrake1. Download Handbrake
Head to handbrake.fr and grab the latest build of the Handbrake ripping app. It runs on OS X 10.6 or later. Open the downloaded disk image and copy the app either to your Applications folder if you intend to keep it, or to the Desktop for single-use. Double-click to open it. 2. Open the disc
Pop your home-burned DVD into the drive. You can also choose to open a disk image or a movie file from the Open browser. Once opened, Handbrake will analyse the disc and identify its contents. It should pick up chapters and display each section in the Title menu. 3. Choose a preset
The menu on the right contains a list of presets for all kinds of devices. If you click on the Devices tab you will see various ones listed; choose the one you need. Here we've gone for an iPhone 4 preset. You can make your own and save them using this menu too. 4. Tweak the settings
Handbrake analyses the source video and automatically set things like frame rate, though you can change this if you like. You can also enter a Constant Quality setting or an average bitrate if you are comfortable playing with this. If you're unsure, stick with the default settings. 5. Picture settings
The other options windows are pretty advanced and needn't trouble most users. Click the Picture Settings button at the top however and you can choose to crop the picture during conversion to make it a custom size. You can also add filters in this window to deal with blocking problems. 6. Add to queue
If you want to rip more than one video or chapter from the same disc you can set up your first encode then hit Add To Queue, then configure more encodes by selecting a new title from the Title menu. Use different settings for subsequent encodes if you like. 7. Start the encode
Press the Start button and Handbrake will create a movie based on your settings. Depending on the length of the video and the quality settings, this can take a while, though on modern Macs you shouldn't wait more than 10 minutes (for example) to encode a 10-minute video. 8. Drop into iTunes
When your encode is done, drag and drop your converted movie into iTunes. From there you can watch it or sync it to any iOS device that supports the frame size. This is why it's important to choose an appropriate preset before encoding - some devices only support up to a certain size. Streaming your mediaGet video to almost any device in your home with these streaming solutions
The Apple TV started life as a rather clunky box with a built-in hard drive, and to get content onto it you had to sync movies from iTunes. Despite still officially being described by Apple as a 'hobby' project, the Apple TV is now a remarkable little box, and tremendous value for the price of just £99. The Apple TV acts as a conduit between your Mac, your HDTV and the internet. Inside your house it can stream movies, pictures and music from iTunes to the TV and as well as having a physical remote, the Remote app for iOS provides excellent tactile control. There's even support for Bluetooth keyboards expected in an imminent update. If you use iTunes Match, your entire music library is available to stream on the Apple TV and you can buy and rent video content from the iTunes Store on it too, as well as using Netflix. Then there's the other apps, like Radio, Apple Events, YouTube, Vimeo and Podcasts amongst others, that let you stream stuff from the internet straight to your TV without using a Mac.
The third incredibly useful thing the Apple TV enables is AirPlay. With an Apple TV on your network, all your iOS devices gain the ability to send video and audio directly to it and hence to your TV, wirelessly. This applies to video and music files but also to photos, and apps like BBC iPlayer that don't have a native Apple TV version. Fire up iPlayer on your iPad or iPhone, activate AirPlay and you can view content on your TV, complete with automatic sizing to make sure everything fits properly. Some games even use AirPlay so your iOS device becomes a controller. Another nice thing about AirPlay is that as long as you're on a network you can stream stuff, so you could show photos or play music at a friend's house wirelessly without having to copy any files manually. Mirroring screensIt's also possible to mirror your iPad or iPhone's display to your TV via the Apple TV by turning on mirroring on the portable device. This is also possible with very recent Macs so you can use your TV as a monitor. Nonetheless you can still mirror your display thanks to third party apps like AirParrot (airparrot.com). If your Mac supports mirroring natively, you'll see an AirPlay icon at the top right of the menu bar. The most recent update to AirPlay is called AirPlay Direct, which enables you to stream audio to a compatible device without the need for a Wi-Fi network. AQ Audio's SmartSpeaker supports this. |


| You are subscribed to email updates from TechRadar: All latest Apple news feeds To stop receiving these emails, you may unsubscribe now. | Email delivery powered by Google |
| Google Inc., 1600 Amphitheatre Parkway, Mountain View, CA 94043, United States | |
No comments:
Post a Comment